Powered by Blogger.

About Me

My photo
මම ඔයාලට පළමුවෙන්ම ස්තූතිවන්ත වෙනවා මෙහි පැමිණීම සම්බන්දයෙන්. මගේ නම ගයාන් අනුරාධ. මම පරිඝණක ක්ෂේතයේ වැඩවලට ගොඩක් කැමතියි. බ්ලොග්විජෙට්ස් එකතු කිරීම,පරිගණක තාක්ෂණය,අලුත් filmනොමිලේ බලන්න,මෘදුකාංග ආදී බොහොමයක් දේවල් ගැන ඔබට අනුරාධගෙ බ්ලොග් එක වෙතින් දැනගත හැකියි . ස්තූතියි.

Blog Archive

Friday, July 9, 2021

How to move your Windows 11 Taskbar icons back to the left corner


 Windows 11 introduces a new, centered Taskbar, complete with icons that are grouped in the center of your screen, rather than the familiar left-hand corner. If this feels weird, here’s how to move your Taskbar icons back to where they were in the days of Windows 10.

Why do this? Muscle memory. By now, you’re probably used to the familiar way of dragging your mouse cursor down to the left-hand corner and clicking the Start menu icon to launch an application. With the Windows 11 layout, you can’t unconsciously do this. In fact, as more icons add themselves to your Windows 11 Taskbar, the Start menu slides farther and farther to the left.

microsoft  windows 11 taskbar centered large darkMark Hachman / IDG

The default layout for the Windows 11 Taskbar is to put all icons in the center.

What this means is that you’ll consciously have to hunt down the Start icon, rather than simply dragging your mouse to the corner. It’s the PC equivalent of hunting for the TV remote.

Fortunately, there’s an easy fix. And when you slide the Taskbar icons over to the left, you’ll find that the Start menu opens up in the left-hand corner, too.

1. Right-click the Windows 11 taskbar, in the blank space that other icons aren’t occupying. You’ll see one option, for Taskbar Settings.

microsoft windows 11 taskbar click taskbar settingsMark Hachman / IDG

2. Clicking that will open the generic Windows 11 Settings menu, specifically Personalization > Taskbar. Scroll down to the bottom and click Taskbar behaviors.

3. Under the first entry, Taskbar alignment, click the only other option, Left. This will automatically slide all of the Taskbar icons to the left, approximating the organization that accompanied Windows 10. That’s all you need to do.

microsoft  windows 11 personalization taskbarMark Hachman / IDG

Simply scroll down the Taskbar page until you can find the alignment option. Click the “Taskbar behaviors” dropdown menu to reveal the alignment options.

Unfortunately, Windows 11 doesn’t allow you to do some things that Windows 10 allowed you to do, such as physically move the Taskbar to the top, bottom or sides of the screen. You also can’t widen or narrow it. Feel free to play around with the other options within the Settings, however, to tweak Windows 11’s taskbar further.

Check out our Windows 11 superguide, where you can find all of our tips, tricks, FAQs and more.

Published: By: Gayan Anurada - 5:59 AM

How to remove the Widgets button from Windows 11


Windows 11 Widgets drawer is huge. But what if you don’t want Widgets? You might not be able to banish it entirely, but you can get rid of the Widgets button from your Taskbar in just a few easy steps.

In fact, if you don’t use the Search icon or even Task View, you can remove those icons from your Taskbar as well. Here’s how.

Widgets is the Windows 11 reboot of News & Interests, the Windows 10 feature that pre-selects news, weather, sports scores and stock prices and collects them in a small widget that lives at the bottom of your screen. (On Windows 10, News & Interests displays the temperature and weather within your Taskbar, while within Windows 11 it does not.)

In Windows 11, however, clicking the Widgets button slides out a massive Widgets drawer from the left hand side of your screen, complete with a search window in the latest build. There’s weather, local traffic, your Microsoft To Do lists, your photos from OneDrive, sports and esports, your stock watchlist, and tips. To some, it will feel huge and obnoxious.

Fortunately, there are two easy ways to get rid of the Widgets button. 

How to get rid of Widgets from Windows 11

The first way is extremely simple: Right-click the Widgets button on your Taskbar, and then click Unpin from Taskbar. Poof! It’s gone.

windows 11 widgets unpin from taskbarMark Hachman / IDG

The second way is to right-click the Taskbar itself and select Taskbar settings. You’ll then be taken to the Windows 11 Settings menu (Settings > Personalization > Taskbar) where you’ll see three toggles: one for Search, one for Task View, and another for Widgets. You can turn off any or all of them, and those buttons will vanish from your Taskbar, too.

windows 11 taskbar widgets microsoft settings
Published: By: Gayan Anurada - 5:56 AM

How to change your computer name in Windows 10


 Did you know that you can give your PC a name? Windows 10 includes a small feature that can help identify your PC by giving it whatever name you’d like, which is especially helpful when you’re trying to manage a number of PCs and need to know which PC is which.

Windows 10 has a lot of great things going for it, but one feature that deserves a big thumbs-down is the randomly generated name it gives your PC during a clean install. Instead of letting you name your computer something memorable, Windows 10 tags it with a name that begins “DESKTOP” followed by a string of numbers and letters. And yes, it will even do this for a laptop, too!

If you have more than one Windows 10 PC, this can get confusing, fast. Is DESKTOP-2P57JKL the PC in the dining room or the one upstairs? Who knows?

Here’s how to fix that.

Go into the Windows 10 Settings menu, then select System. Scroll down the left-hand nav bar to About. There, you’ll see a list of handy device specifications, with the type and speed of the installed processor, the system memory, and more. Click the “Rename this PC” button that appears there.

change your pc windows 10 settings editMark Hachman / IDG

In the Windows 10 Settings menu, go to the System > About page. Click the “Rename this PC” button in the center of the page.

Previously, you would have to enter the legacy Windows Control Panel and make the change in the System Properties menu. No longer. All you need to do is enter the new name in the “Rename your PC” field and click “OK”. Note that Microsoft doesn’t allow you to get too creative—you won’t be able to use spaces or punctuation, so “Mary’s PC” is flat out. Instead, you’ll have to use a rather vanilla combination of capital letters and numbers.

You’ll be prompted to restart your PC either now or later, and once you do, the name change will take effect.

windows 10 rename your pcMark Hachman / IDG

You can’t get too fancy with Windows’ naming scheme.

You can probably get by just fine without renaming your PC. However, if you manage a home with a few laptops in it, giving each laptop a familiar name (“HPENVY” or “MOMSLAPTOP”) can be helpful in a pinch. If you’ve ever misplaced a laptop and need to use Microsoft’s own “Find my device” feature, knowing which laptop is missing or needs managing can be extremely helpful. It's also great for managing Microsoft 365 licenses, too!


Published: By: Gayan Anurada - 5:46 AM

How to disable start up programs in Windows 10 to make boot times faster

 You can find plenty of Windows programs to help cut down boot times, but they’re not necessary. Everything you need to make Windows faster is already waiting for you in an old, built-in utility: the Task Manager.

This storied program isn’t just the place to stop annoying processes that refuse to shut down. The Task Manager can also help manage startup times. Open the Task Manager by tapping Ctrl + Shift + Esc. Alternatively, hit the Windows Key, type “Task Manager,” and select the Task Manager from the search results that appear.

taskmanagersimplifiedIDG

The Task Manger in Windows 10 in simplified mode.

If the Task Manager is in minimal display mode click on More details in the bottom left of the window to see the full program.

In the expanded view select the Startup tab. This section lists all the various third-party programs that are trying to launch at boot time. Almost all of them can be turned off, but there are likely a few that you’ll want to leave untouched.

To figure out what must go and what can stay, look at the Startup impact column. Any programs classified as “High” or “Medium” should be candidates for disabling. The exception would be any mission-critical programs, such as a soundcard’s desktop program, a password manager, or something related to the graphics card. Items like web browser helpers or VPNs, on the other hand, can wait to launch until you actually need them.

taskmanagerexpandedIDG

Click the Disable button to stop a program from trying to launch at boot.

To disable a program, select it so that it’s highlighted, and then at the bottom right of the window click the Disable button. Under the Status column you’ll now see that the program has switched from Enabled to Disabled. Continue as needed through the list of third-party programs.

Reducing the number of installed applications fighting for resources during boot time is a great way to speed things up. But what about reducing Windows’ built-in features that might be slowing things down?

There are a few additional things you can do to speed up Windows 10 boot times, but your options are limited. First, if you shut down your PC regularly then you should activate the Fast startup feature if it isn’t already enabled. This option cuts down on boot times by saving the system state at shutdown in order to startup a little faster. We have an article explaining how to turn on Fast startup.

To squeeze a little more speed out of your boot time, you can also run Disk Cleanup. This will get rid of any junk files and make your SSD or hard drive operate a little more efficiently. 

sabrentnvmeSabrent

An NVMe gumstick SSD is the best performance upgrade for PCs.

Speaking of hard drives, if your PC is still using a mechanical drive as its primary drive, then take boot times to the next level by upgrading to an SSD. If your motherboard can accept an M.2 “gumstick” NVMe drive, that’s the ideal, and with an M.2 drive you can even keep your old hard drive as secondary storage. If the manual for your PC or motherboard says you don’t have an M.2 slot, then a 2.5-inch SSD is an excellent second choice. Installing an SSD is one of the simplest hardware upgrades you can perform, and the difference it makes in overall performance is dramatic.


With these tips you should see a noticeable improvement in your PC’s boot time, and the best part is it doesn’t require any special third-party software downloads.

Published: By: Gayan Anurada - 5:43 AM

Windows 10 Hidden Tips and Tricks for 2021

 More than 800 million devices run on Microsoft Windows. The original kingpin of operating systems (OS) is still going strong, and their latest release has even more features to help make using your computer faster and smoother. 

Now that support for Windows 7 has ended, most of the world has moved to Windows 10, most often coupled with Microsoft 365 (which used to be called Office 365.)

Whether you've been using Windows 10 for awhile now, or you've just recently upgrade, there are plenty of tips and tricks to learn!

Keep in mind that Microsoft updates their software a few times throughout the year with new applications, settings, and customization options, so be sure to check that your PC is up to date with the latest Windows 10 release!


1. Personalize the Start Menu

The first thing you probably noticed with Windows 10 was the colorful and vibrant Start menu. 

What once was a button on the bottom of your screen has grown to become a full-screen experience with live “tiles” that show images and even advertisements.

But did you know that you can customize it?

Hit the Windows icon at the bottom of your screen and go to Start > Settings > Personalization > Start, to customize the look of your new environment.

You can choose which system folders you want to see on the left hand side, show recently added apps, rearrange and resize the tiles, and much more. Here's a good article that can give you all the nitty gritty details on customizing the Windows Start menu!

 Don't like the new Start menu?

If you prefer the old menu, simply head in to Start > Settings > Personalization > Start, and turn off every button, except “Show app list in Start menu", as shown below.

This will bring back the more familiar menu!


2. Search In Windows 10 Quickly and Easily

The search feature in Windows 10 is absolutely the most useful tool on the entire OS. No longer just meant to help you find a misplaced file, the search is integrated into systems menus as well.

Click the search icon at the bottom left of your screen to get started. By default, the search window shows the top apps you use, as well as recent activities, so you can easily click on the programs and files you use most. 

Simply start typing in the taskbar at the bottom of the search window, and Windows will get you what you need.

If you want to quickly narrow down the search by category, choose one of the 3 icons that appear on the top left of the window, as seen below.

From left to right, you can guide Windows to only search in Apps, Documents or the Web.


3. Use Focus Assist to Keep You On-Task

We’re always being interrupted from our work. Notifications pop up at random intervals to pull our attention away from what we really need to be doing.

Focus Assist is here to keep you on track. Flick a switch and you’ll banish notifications, alerts and more from pestering you when you need to stay on track.

You can find Focus Assist under Settings > System > Focus Assist.

The no-interruption software can be configured to turn on automatically during certain hours, or you can  turn it on manually when you’re presenting or sharing your screen, to prevent what sometimes can be embarrassing notifications that might pop up!

You can also customize the priority of your notifications.

Some contacts will need to get through no matter what you’re focusing on. We’ve talked about the importance of configuring VIPs on your phone, and you can do something similar for your PC.

Under Focus Assist settings, select “Priority Only.” Beneath this option, you’ll see “Customize your priority list,” where you can select the important people and even applications you want to receive immediate alerts from.

Everything else will be pushed aside so you can stay focused on your tasks at hand.

Don't worry, your action center will show you a summary of what you missed while Focus Assist was enabled whenever you’re ready to let your mind wander.

Keep those distractions under control!


4. Use Multiple Virtual Desktops To Manage Projects

If you only have a single monitor, having multiple virtual desktops is a very handy feature!

Even if you have multiple monitors, juggling a whole bunch of different projects on the same computer can be a challenge.

The Task View pane in Windows 10 allows you to add an unlimited number of virtual desktops quickly and easily. You can manage the view of your virtual desktop, and move applications to different desktops, show windows on all desktops or close pages on a selected desktop. 

To add a virtual desktop, open up the new Task View pane by clicking the Task View button (two overlapping rectangles) on the taskbar at the bottom of your screen, or by pressing the Windows Key + Tab.

You'll see all your currently open tasks that you are working on, but look up the top right of your screen and you'll see + New Desktop. Click on + New Desktop to add your new "virtual desktop."

To switch between virtual desktops, open the Task View pane and click on the desktop you want to switch to. You can also quickly switch desktops without going into the Task View pane by using the keyboard shortcuts Windows Key + Ctrl + Left Arrow and Windows Key + Ctrl + Right Arrow

Now you can quickly move from desktop to desktop to find all of your different projects and associated tasks!


5. Have You Heard of the Cloud Clipboard?

Here's another feature that very few people take advantage of. It's called Cloud Clipboard, and it let's you seamlessly copy and paste text, links, and pictures across multiple devices.

To bring up the cloud clipboard menu, hit the Windows key + V.

This will cause the cloud clipboard to appear, showing the content previously clipped and copied - including text, HTML and images less than 1MB in size.

Copied text in this clipboard history can also be shared across all devices that are signed into the same Microsoft account, providing that text is less than 100kb in size.

To select a piece of content from the clipboard history, left click on it. Then, select paste from the dropdown menu or hit Ctrl + V and you can paste that selected content wherever you want.


6. Take Advantage of Dark Mode and Night Light

Do you work late at night or early in the morning? A too-bright monitor can cause headaches and eye strain.

  • Dark Mode - Under Settings > Personalization > Color, you can select "dark" as the default Windows and/or app mode. This turns your bright white screen a little darker, making most of your Windows apps and features show white text against a black or gray background. You can play around with using this at different times of the day, to see what works for you.
  • Night Light - Now that we're all on video calls such as Zoom for most of the day, you may notice that when sitting straight in front of your huge monitor, all that white light shining on your face makes you look over-exposed. Just go to Settings > System > Display and turn on "Night Light". Night Light, a “blue light filter”,  is intended to make your display use warmer colors at night to help you sleep better and reduce eyestrain - but turning it on throughout the day will help you look A LOT better on those incessant video calls!

7. Securing Your Windows 10 Machine

We would be remiss if we didn't include include basic security tips for Windows 10. 

Here are just a few tips that every user should know, but keep in mind cyber security protection has become much more complex and goes far beyond making sure your individual PC has the right settings turned on.

Always consult with a qualified cyber security consultant to learn how to properly protect your business or home office!

  • Keep Windows up to date. By default, Windows updates automatically. That means you might occasionally get an update you don’t want and can’t prevent. But generally, you’ll want your updates right away – some updates are urgent security fixes.
  • Set a log-in password if you haven’t already. Many people don’t bother to establish a log-in password when they set up Windows. But without one, your computer is vulnerable to anyone! Go to Settings > Accounts > Sign-In Options and under Password, click Add.
  • Make sure your security software is running and up to date. Windows 10 comes with basic malware protection, but we recommend additional measures. Please contact a knowledgeable IT security expert who can help ensure you are well protected!
  • Keep applications updated and uninstall software you never use. The smaller your attack surface, the safer you are. Shrink it by uninstalling applications you’ll never use. That might be bloatware which came with your computer, takes up space, and potentially risks your safety and privacy. If you don't use it, delete it.
  • Consider encryption. If someone steals your logged-on computer or remotely accesses your files, they can steal valuable data. Consider encrypting it. Windows 10 Professional, Enterprise, and Education versions come with BitLocker, which can encrypt your built-in or portable drives. Again, if you're not comfortable configuring these types of security settings, consult an expert.
  • Use a VPN on the road. Mobile Wi-Fi hotspots can be unsafe. If you’re doing anything important, use a VPN that encrypts everything you send and receive. Your employer likely already provides one, but if you're a sole entrepreneur, there are lots of options to set up your own VPN.

There's plenty advice out there on how to get the most out of Windows 10, but honestly there is no better resource to utilize than Microsoft itself. Check out their latest resources to get started on your journey to becoming a Windows expert!


Published: By: Gayan Anurada - 5:28 AM
hi everyone kevin here today i want to

show you

five awesome features in windows 11.

now we all know that windows 11 has a

lot of new functionality

but these features are at the top of my

list

all right let's jump on the pc and let's

check these out

this brings us to awesome feature number

one and

that's windows dictation with auto

punctuation

in the past on windows 10 you could

dictate but it didn't include

punctuation

here i have a notepad file open and to

open up windows dictate i'll press the

windows key

together with the h key h is in hotel

and this opens up the dictate tool right

down below

here if i click on the settings gear

here i can see all of the different

settings and there's now a new option

for

auto punctuation i'll make sure to turn

that on

now when i click into this text field i

can click on the microphone and it'll

start listening

have you ever tried a cookie from the

kevin cookie company

they are the best cookies in the world

and check that out it adds all of the

correct punctuation here put a question

mark in and here it inserted a period

so the dictation tool has become much

more useful in windows 11.

this brings us to awesome feature number

two

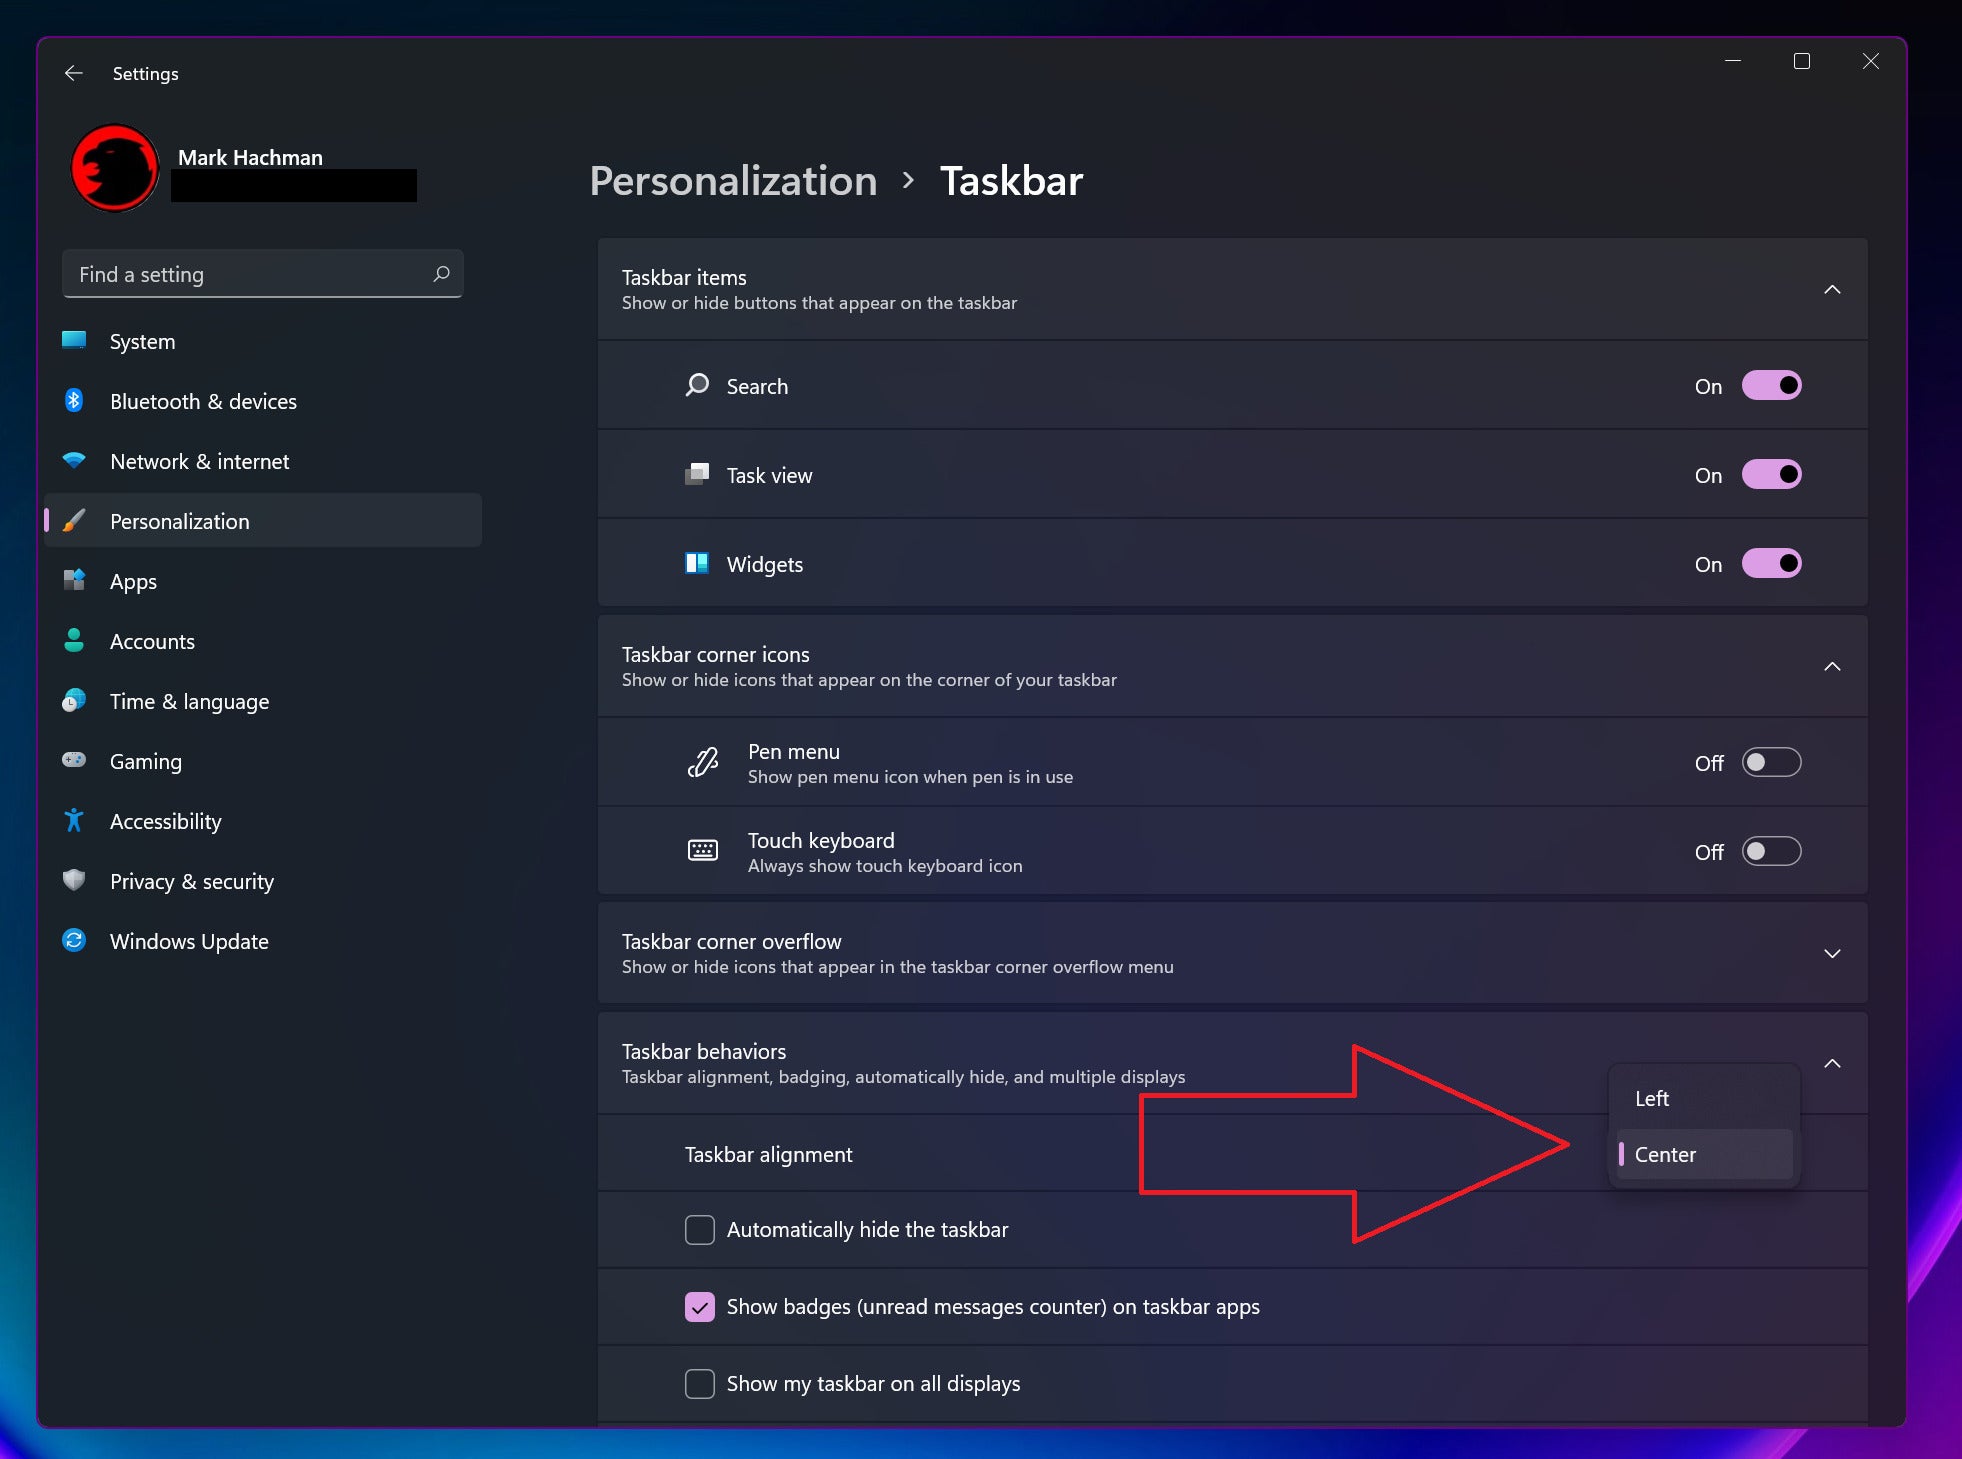
you can now set up multiple desktops and

you can customize

what those desktops look like on the

taskbar there's an icon to view all of

your desktops

and when i click on this i can see that

i currently have one desktop

when i click on the plus icon this will

add another desktop

over here i can right click on it and

now i can customize it

this is something that i could not do on

windows 10.

here i can click on rename and maybe

i'll call this one play

and just for the fun of it i'll press

the windows key together with the

semicolon key

and i can insert an emoji here i'll go

with a robot since that's what my voice

sounds like

here when i right click on it i can also

choose a custom background

for this desktop let me go with this

light background i could also shift the

position of my different desktops

i could right click and here i can move

it to the left or i can move it back to

the right

i could also simply click on it and drag

it to the position that i want

to jump to my various desktops all i

need to do is click on it here

and that'll bring me to the other

desktop but what's even faster i can

simply use shortcut keys

i can press the control key together

with the windows key and my arrow keys

and then i can navigate between all of

my desktops overall

multiple desktops have gotten a lot

better in windows 11 but it's still

missing some key functionality

you can't currently customize the apps

that appear on the taskbar

across your different desktops and you

can't currently take

one of your desktops and put it on one

monitor and another desktop and place it

on

a different monitor this brings us to

awesome feature number three

and no it's not my new website

kevinstratford.com

right over here although i would say

that is a pretty awesome website

in windows 11 you're now able to take

snapping to the next level

and i could always snap in windows 10.

here i could simply take a window

drag it over to the side and i could

snap it into that position

but now along with being able to simply

drag it over to the edges

here i can hover over the maximize icon

and i get these nice snapping hints

so maybe i'll place this in the top

right hand corner and right down here

i'll place this in the bottom right hand

corner so i have a little bit more

flexibility now

if you really want to take snapping to

the next level microsoft offers a free

tool

called power toys and this is available

on both windows 10

and also on windows 11 and you can do

so much beyond what you can do in

windows 11. here for example i have

power

toys open and over on the left hand side

there's something called

fancy zones think of this as very

advanced

snapping over here i can launch a layout

editor and

i can choose exactly what i want my

different snap zones to look like

and if i'm not satisfied with any of

these options i could also create

my own layout so here let's go with a

grid and i'll click on create

if you look at this i could select

exactly what my snapping grid looks like

so once again you get

a ton of power around snapping along

with snapping you get

all of these other awesome tools and

once again it's completely free to

download and

install if you're interested in power

toys i've included a link in the

description down below

awesome feature number four and this

one's related to snapping

once i take the time to snap all of

these different windows on my screen i

don't want to have to go through all of

that again

luckily there's now something called

snap groups now

if you remember i had three different

browser windows that i had snapped to my

screen

i can go down to my taskbar and they

were chrome windows

here i could see each one of the

individual windows and

i now also see the entire group so here

when i click on the group that'll

restore the entire group back onto my

screen

this brings us to the last awesome

feature of today

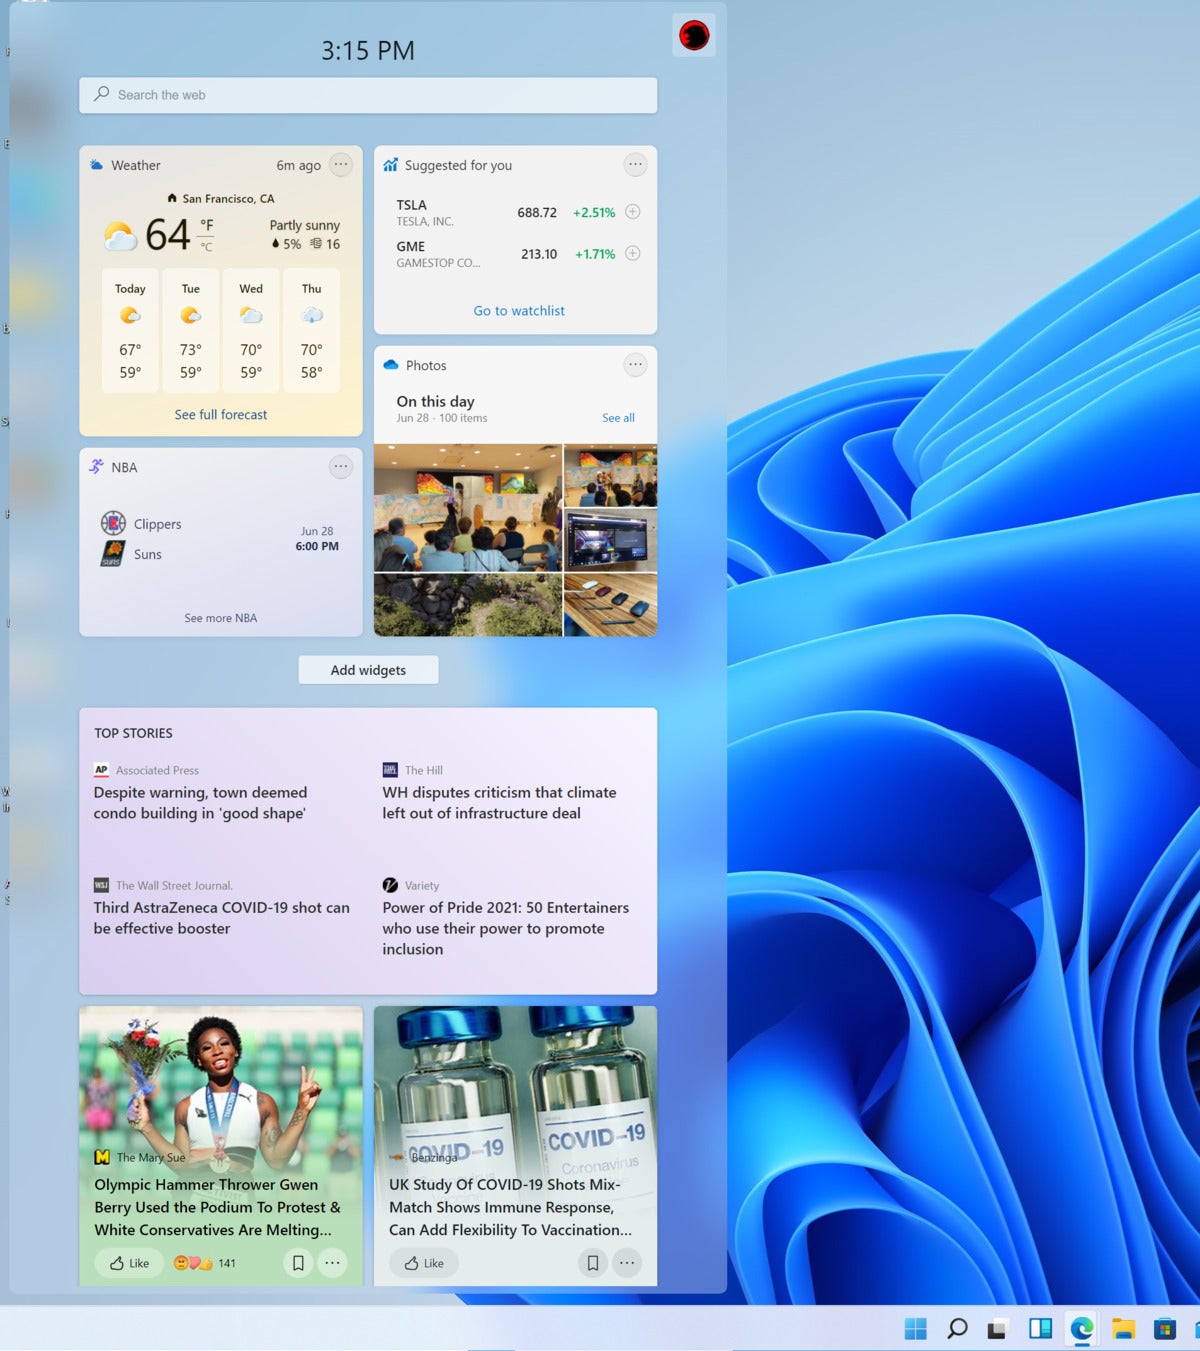
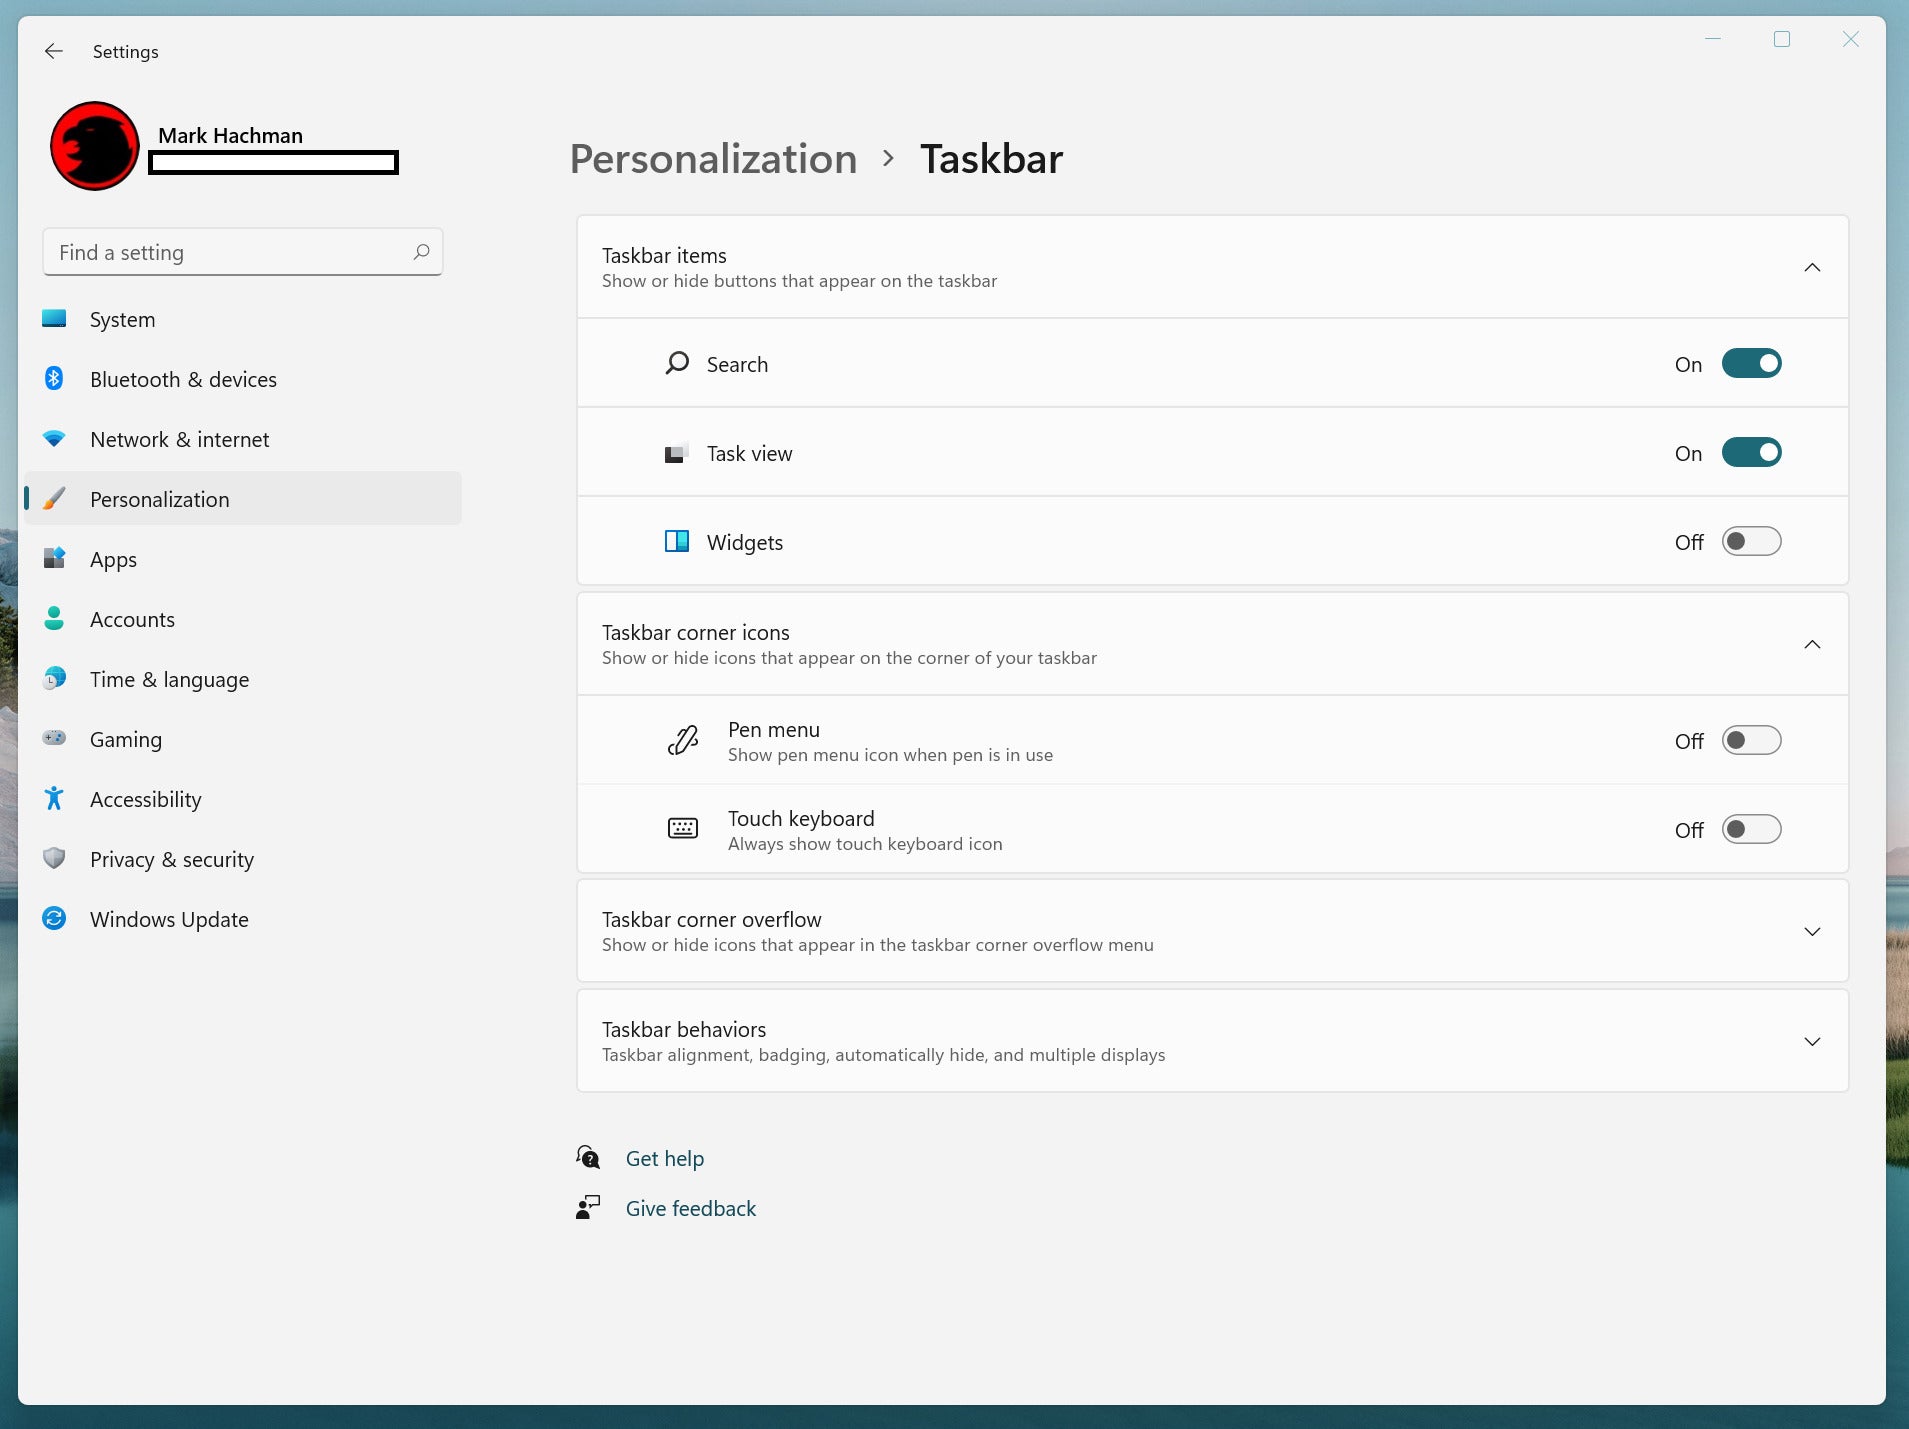
and that's the inclusion of widgets in

windows 11.

it's a little bit of a flashback to

windows 7.

right down on the taskbar i can click on

the widget icon

and here i get a whole bunch of helpful

information

here for example i could see all of my

tasks hey it says film a video well i'm

doing that so let me check that item

over here i can see the weather the

calendar traffic information

photos i get all this information and i

can also customize

what these look like when i click on the

ellipsis i could set it to small medium

large

and i could even customize it with the

weather for example i could set my

location

here i'll click on cancel here i could

also reorder

all the different widgets so it appears

how i like it

and if i go down right at the bottom i

can also add additional widgets and here

you can see

all of the different widgets that are

available and my guess is

over time you'll see more widgets join

this list

down below you'll also see some of the

top news headlines

before we wrap up i want to leave you

with one bonus awesome feature

and to be fair this isn't new to windows

11 but

it's really not that well known and it's

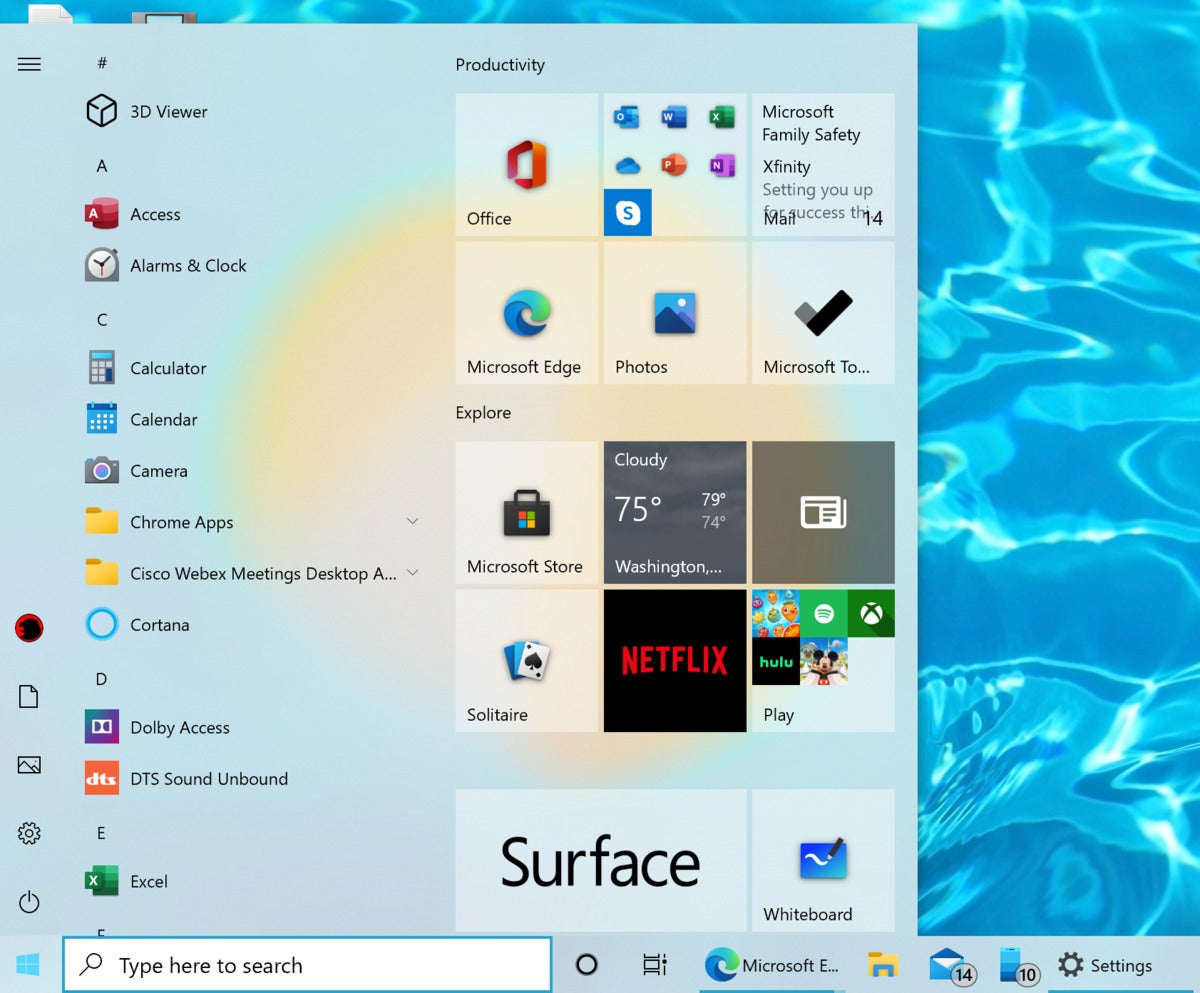
the secret start menu

down on the taskbar i have my typical

start menu i click on it with my left

mouse and that opens up

but instead of left clicking on it i can

right click on it

and that opens up that secret start menu

right up on top

i have some settings and i can jump

directly to them

and down below i could also open up the

task manager and i have a few other

settings as well

so it's just a handy thing if you need

to quickly jump to any of these settings

let me know down below in the comments

would you add

any other features to this awesome

feature list

to see more videos like this please

consider subscribing and

Published: By: Gayan Anurada - 5:19 AM

5 useful WhatsApp tricks and hidden features

Despite some flocking to Signal and Telegram due to WhatsApp’s controversial privacy update, the fact remains that the Facebook-owned messaging app still dominates the market. WhatsApp has more than 2 billion users worldwide, making it by far the most popular messaging app. Although many have jumped to rival chat apps in recent months, experts say it’s likely to have a major impact on WhatsApp’s overall popularity. The chat app remains the best messaging platform to send texts, share photos and even make video calls.

We’ve tracked down some of the least widely known WhatsApp tips and tricks to help you get more out of the popular messaging app.

Hide the blue ticks

The blue ticks you see next to messages are useful as it alerts a user when messages are sent through and read. Those blue ticks can prove to be troublesome when you don’t reply to a person instantly. The solution: turn off your read receipts. Here’s how to do it: Go to Settings -> Account -> Privacy and then untick the “Read Receipts” box. There is, however, a limitation. Keep in mind that the feature won’t disable the read receipts for the group chat.


Hide your profile picture

There have been times when you don’t want everyone to see your profile picture, especially when you are a part of annoying family groups. The good news is that there is a way to hide your profile picture on WhatsApp from those who don’t know you personally. To do this, open WhatsApp and go to Settings. Click on Account and then click on Privacy. Now, tap on Profile photo. You will get three options: ‘Everyone’, ‘My Contacts’, ‘Nobody’. In case you want your profile photo to be visible to people whose numbers are saved in your contacts, then simply select ‘My Contacts’. If you want no one sees your profile picture, choose ‘No One‘.


Reply to a group message privately

Did you know you can send private messages in group chats? WhatsApp lets you send private messages to members in group chats, meaning it is possible to reply to specific group members — keeping the conversation invisible to everyone else. If you an iPhone, all you need to Press and hold a message in a group chat. Tap the “… More” option, and then tap “Reply Privately”. If you’re using an Android smartphone, the menu will appear at the top of the screen. You’ll need to tap the three dots in the top right-hand corner to access the “Reply Privately” option.


Stop images and video appearing in your gallery

WhatsApp automatically downloads photos and videos on your phone’s gallery. Some users find it annoying as it consumers storage and data, but there is a way to stop WhatsApp from saving photos and videos on your phone. Open WhatsApp and then select Settings. Head to Media Auto-Download, where you will find three options: When Using Cellular Data, When Connected on Wi-Fi and When Roaming. Disable auto-downloads by unchecking all three options, Images, Audio and Video.


How to block a WhatsApp contact

While WhatsApp allows you to get in touch with friends and family, there are times when you feel you don’t want want to get in touch with someone. Thankfully, it is simple to block a contact on WhatsApp. To be clear, blocked contacts will not be able to call or send messages to you, and your status updates will not be visible to them. If you block the contacts on the messaging platform, WhatsApp will no inform them that they have been blocked. You can anytime, unblock them. Here how to do it:

1.) Open WhatsApp.

2.) Go to Settings> Specific chat>Tap on contact info at the top>Scroll down to the bottom > Block Contact.


Published: By: Gayan Anurada - 5:06 AM